Exercise 6: Working with text
Please complete Exercise 5 first, since the steps below build upon your work from that project.
Text as tilesets
-
Open your project called "BOUNCE BRIX" that you saved from Exercise 5.
-
Go to the TILES screen, then click the "NEW TILEMAP" button:
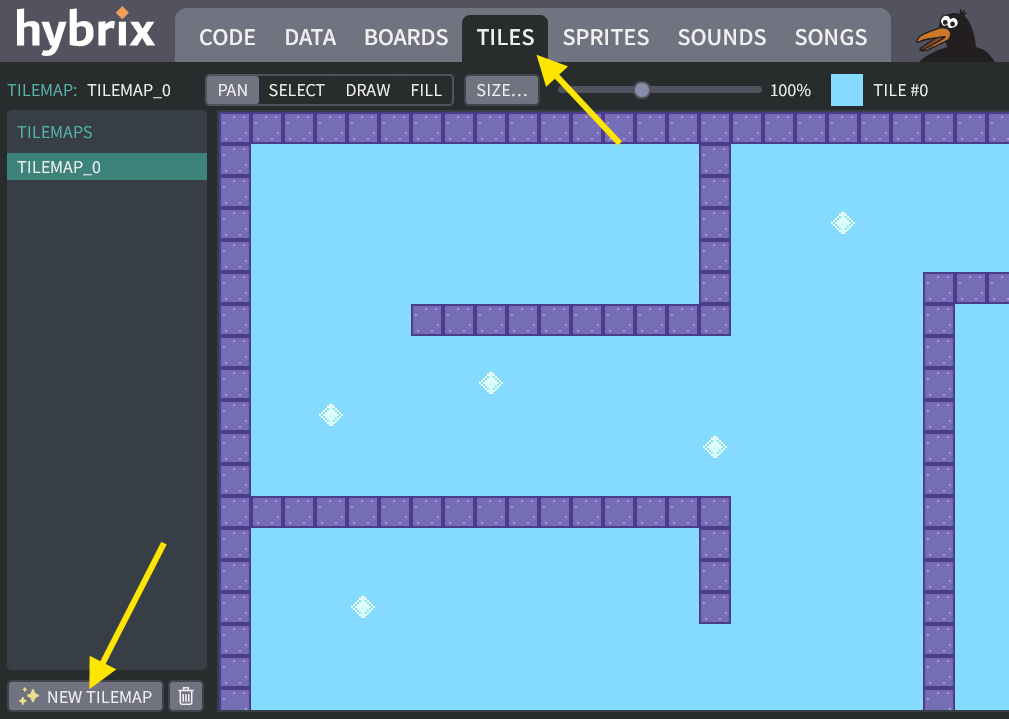
-
You should now have a tilemap called "TILEMAP_1" listed below your game map (which was "TILEMAP_0").
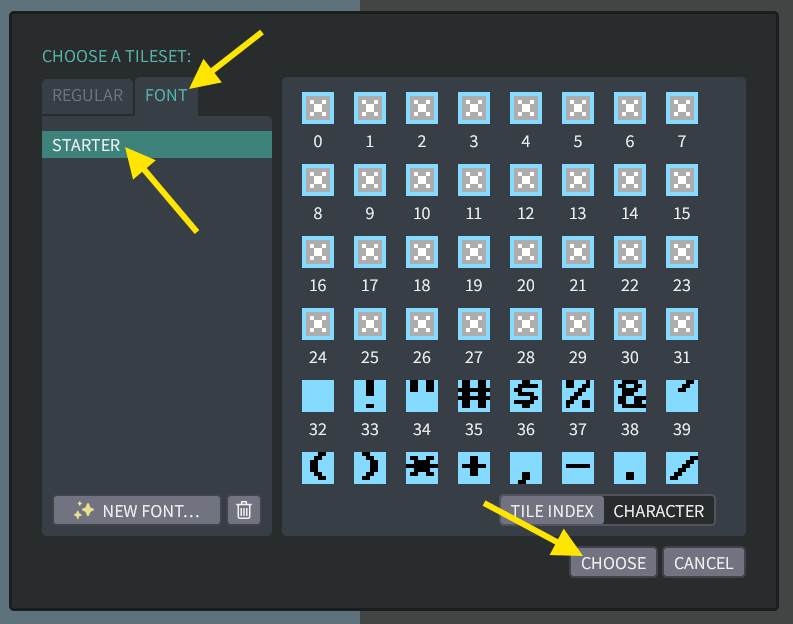
With "TILEMAP_1" selected, click the "TILESET…" button:

-
The "CHOOSE A TILESET" window will open. Click the "FONT" tab, then click on the "STARTER" tileset.
Then click the "CHOOSE" button:
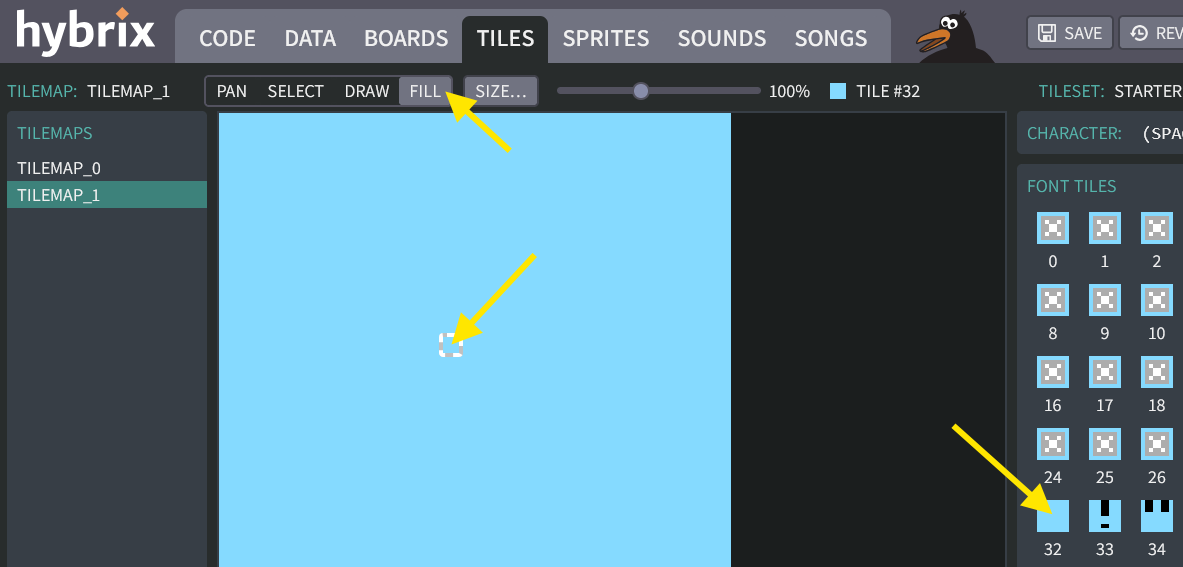
Your map will change to show the gray "x" boxes that indicate control codes (tile #0 from our font):

-
Let's clear our text "screen" by filling it with spaces. In the "FONT TILES" tray on the right, click the box numbered 32 (the space character). Then click the "FILL" button. Then click anywhere in the blue tilemap rectangle to fill it:
-
Now click the "DRAW" button. In the "FONT TILES" tray on the right, find the letter "A" and click on it. (You may need to scroll down a bit.) Then click on the tilemap to draw a letter "A".
Try drawing letters "B" and "C" as well:

-
Draw some more letters and symbols from the tray. Draw whatever you like! See what kind of pictures you can make using the "STARTER" font.
Here are some ideas:


What did we learn?
Hybrix displays text using the same tilemap system that we used to make our game maze. The text font (letter appearance) is a normal tileset, just with smaller sized tiles. Each letter is a single tile. This is called a bitmap font, meaning that the letter pictures are made from pixels instead of lines and curves. It is also called a fixed-width font, meaning that each letter and punctuation mark has the exact same size.
You can show text in your program by using the Hybrix designer to make tilemaps, but it is not very convenient. The
CONSOLEis a better way: It can print messages, change colors, and scroll the screen, and even let you type using a blinking cursor. Let's try the console!
Text from keyboard input
-
Go to the CODE screen, and choose your "MAIN" file. It should still have the starter file code:

We'll add a function called
TYPE_ON_SCREEN()that reads a key from the keyboard. If a key was typed (KEY <> 0), we callCONSOLE::PRINT_CHAR()to print it on the screen:FUNC TYPE_ON_SCREEN()
TRUE -> CONSOLE::CURSOR_VISIBLE
VAR KEY: BYTE
CONSOLE::READ_KEY() -> KEY
IF KEY <> 0 THEN
CONSOLE::PRINT_CHAR(KEY)
END IF
END FUNCAdd a call to the
MAIN::TYPE_ON_SCREEN()function at the end of the mainLOOP, as shown below:(Click to see the complete "MAIN" file with these changes)
The "MAIN" file:
MODULE MAIN
FUNC START()
ENGINE::INIT()
SOUND::INIT()
CONSOLE::INIT()
IF SYMBOLS::SCENES <> NULL AND SYMBOLS::SCENES.SIZE > 0 THEN
SYMBOLS::SCENES[0].LOAD()
END IF
LOOP
ENGINE::RENDER()
ENGINE::WAIT_FOR_PAINT()
ENGINE::THINK()
SOUND::THINK()
CONSOLE::THINK()
MAIN::TYPE_ON_SCREEN()
END LOOP
END FUNC
FUNC TYPE_ON_SCREEN()
  TRUE -> CONSOLE::CURSOR_VISIBLE
  VAR KEY: BYTE
  CONSOLE::READ_KEY() -> KEY
  IF KEY <> 0 THEN
    CONSOLE::PRINT_CHAR(KEY)
  END IF
END FUNC
END MODULE -
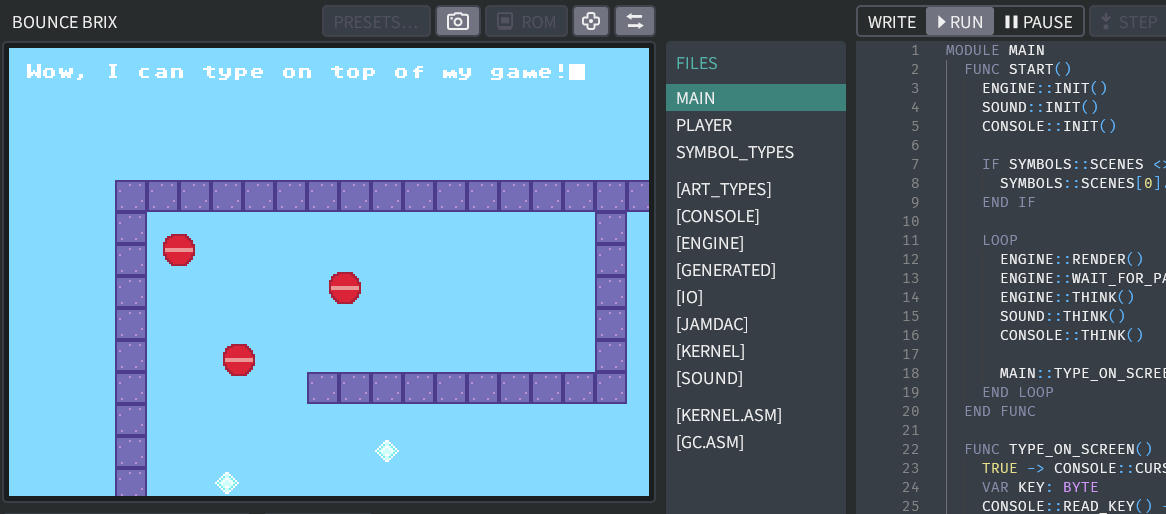
Click the "RUN" button to run your code. You should now see a blinking cursor on the screen. If you type words using the keyboard, they will appear on top of your game maze!
Two tilemaps at once?
The Hybrix's virtual machine's video hardware is called "Palix". Palix can show as many as 64 sprites and 3 tilemaps at the same time. (See Palix: tiles for technical details.)
The three Palix tilemaps are called Tilemap A, Tilemap B, and Tilemap C. The Hybrix framework usually connects the
CONSOLEto Tilemap A, and it uses Tilemap B to display your scene from the board. According to the display priority rules, Tilemap A will always appear in front of Tilemap B.What if you wanted the
CONSOLEtext to appear behind your game map? You could change some of the setup fromCONSOLE::INIT()to move theCONSOLEto Tilemap C instead of Tilemap A. -
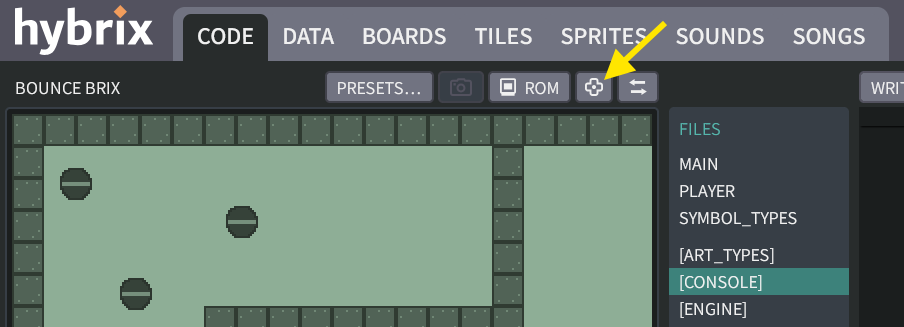
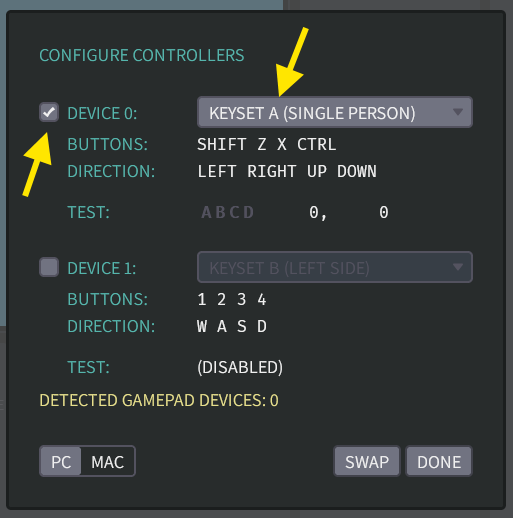
You may notice that when you press the arrow keys on your keyboard, the ball moves around the maze. This is a bit distracting! We can fix that by temporarily disabling the virtual gamepad.
Click this button to open the "CONFIGURE CONTROLLERS" window:
Then unmark the checkboxes for "DEVICE 0" and "DEVICE 1":
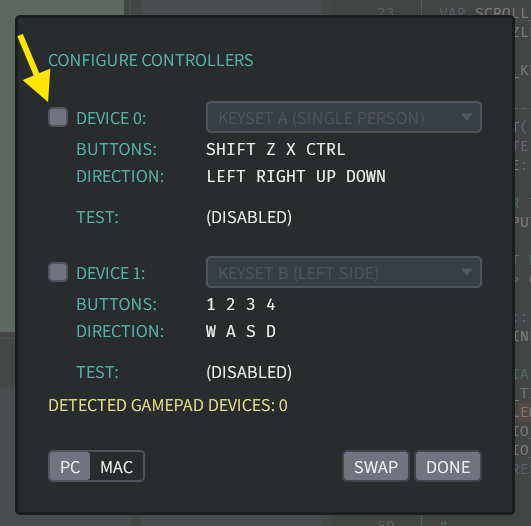
Then click the "DONE" button to close this window. Now when you run your program, you can use the keyboard arrows without moving the red ball.
-
Each tile number corresponds to a keyboard key. For example,
Ais number 65,Bis number 66, and so forth. This mapping from numbers to tiles is called HASCII. (All the details are explained on the HASCII Table reference sheet.)When our loop calls
CONSOLE::PRINT_CHAR()with the number 65, it will printAon the screen and move the cursor. There are also some special control codes with interesting effects.Try typing these keys while the program is running:
HASCII Escape Type this... ...to make PRINT_CHAR() do this: 18 {2}CTRL+2change the cursor color to RED 19 {3}CTRL+3change the cursor color to ORANGE 21 {5}CTRL+5change the cursor color to GREEN 3 {SUP}CTRL+Cscroll the screen up by one line 4 {SDOWN}CTRL+Dscroll the screen down by one line 5 {CLS}CTRL+Eerase the whole screen 6 {CLL}CTRL+Ferase the current line only 9 {TAB}TABmove the cursor rightwards to the next tab column 11 {HOME}HOMEmove the cursor to the upper left corner of the screen
Apple keyboards:FN+LEFT12 {END}ENDmove the cursor to the lower left corner of the screen
Apple keyboards:FN+RIGHT14 {REV}CTRL+,enable reversed theme mode
(the effect used to blink the cursor)15 {MAT}CTRL+.enable matte coloring mode, where color #0 (clear) is replaced by IO::MATTE_COLOR1 {RESET}SHIFT+ESCdisable the {REV}and{MAT}modes(Even more control codes can be found in the HASCII Table.)
👉 Make sure to give "matte coloring" a try; we'll use this effect in Step 17.
👉 The "reversed theme" can also be used to make complementary shapes, for example transforming character
{$B1}from▝into▙, or transforming character{$B9}from◤into◢.
Text with PRINT
-
Now let's try printing more than just one letter at a time. We'll add a function like this:
FUNC SHOW_SCORE()
  CONSOLE::PRINT("HELLO {CAT}")
END FUNC
...and then update our
TYPE_ON_SCREEN()function to call this function whenever you press theESCkey on your keyboard:IF KEY = 27 THEN # (27 IS THE ESCAPE KEY)
MAIN::SHOW_SCORE()
ELSIF KEY <> 0 THEN
CONSOLE::PRINT_CHAR(KEY)
END IFTo save time, you can copy+paste the entire file from the box below:
(Click to see the complete "MAIN" file with these changes)
The "MAIN" file:
MODULE MAIN
FUNC START()
ENGINE::INIT()
SOUND::INIT()
CONSOLE::INIT()
IF SYMBOLS::SCENES <> NULL AND SYMBOLS::SCENES.SIZE > 0 THEN
SYMBOLS::SCENES[0].LOAD()
END IF
LOOP
ENGINE::RENDER()
ENGINE::WAIT_FOR_PAINT()
ENGINE::THINK()
SOUND::THINK()
CONSOLE::THINK()
MAIN::TYPE_ON_SCREEN()
END LOOP
END FUNC
FUNC TYPE_ON_SCREEN()
TRUE -> CONSOLE::CURSOR_VISIBLE
VAR KEY: BYTE
CONSOLE::READ_KEY() -> KEY
IF KEY = 27 THEN # (27 IS THE ESCAPE KEY)
  MAIN::SHOW_SCORE()
ELSIF KEY <> 0 THEN
  CONSOLE::PRINT_CHAR(KEY)
END IF
END FUNC
FUNC SHOW_SCORE()
CONSOLE::PRINT("HELLO {CAT}")
END FUNC
END MODULEClick the "RUN" button. Now whenever you press
ESC, the word "HELLO" gets printed with a cat!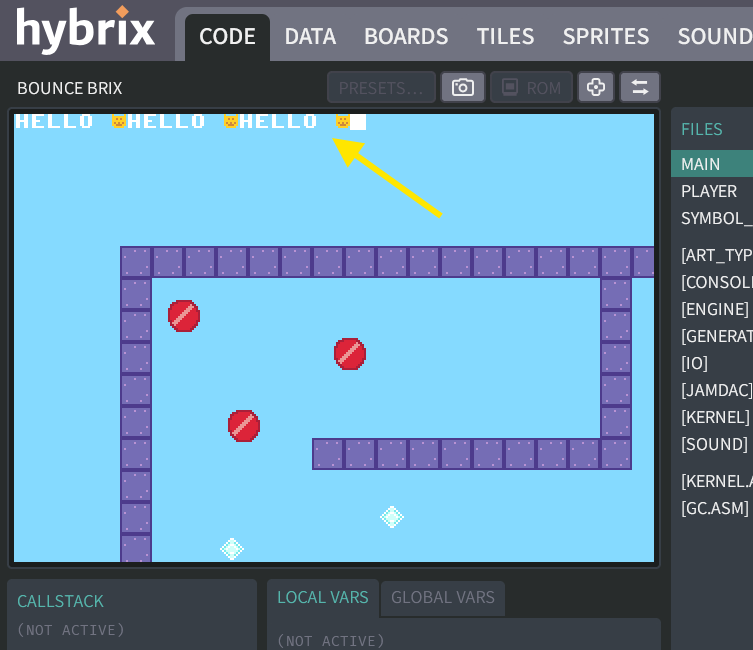
Try holding down the
ESCkey so it repeats. It will print very fast! -
The special
{CAT}pattern is called an escape sequence. It "escapes" from the regular meaning of the characters, allowing you to specify special character values.Try putting these other escape codes in your
CONSOLE::PRINT("HELLO {CAT}")statement:Escape ...to print this: {CAT}🐱 {COIN}🪙 {NOTE}♫ {-->}🠞 {<--}🠜 {#:#}▓ {:::}▒ {: :}░ {$9A}♥ {D}makes the cursor move down. What will this do?CONSOLE::PRINT("{D}{-->} HELLO {<--}")
Keeping score
-
Let's "keep score" in our game by counting the number of diamonds that you collect. To test our logic more easily, for now we'll simply increase the counter whenever you press
ESC. (Later in Step 20, we'll make it happen when you really collect a diamond.)Add a variable under
MODULE MAIN:VAR DIAMOND_COUNTNext change your
FUNC SHOW_SCORE()block to add 1 each time. We can also useCONSOLE::PRINT_INT()to print the number before our message"DIAMONDS !":FUNC SHOW_SCORE()
MAIN::DIAMOND_COUNT + 1 -> MAIN::DIAMOND_COUNT
CONSOLE::PRINT_INT(MAIN::DIAMOND_COUNT)
CONSOLE::PRINT(" DIAMONDS!")
END FUNCHere's the MAIN file with all these changes:
(Click to see the complete "MAIN" file with these changes)
The "MAIN" file:
MODULE MAIN
VAR DIAMOND_COUNT
FUNC START()
ENGINE::INIT()
SOUND::INIT()
CONSOLE::INIT()
IF SYMBOLS::SCENES <> NULL AND SYMBOLS::SCENES.SIZE > 0 THEN
SYMBOLS::SCENES[0].LOAD()
END IF
LOOP
ENGINE::RENDER()
ENGINE::WAIT_FOR_PAINT()
ENGINE::THINK()
SOUND::THINK()
CONSOLE::THINK()
MAIN::TYPE_ON_SCREEN()
END LOOP
END FUNC
FUNC TYPE_ON_SCREEN()
TRUE -> CONSOLE::CURSOR_VISIBLE
VAR KEY: BYTE
CONSOLE::READ_KEY() -> KEY
IF KEY = 27 THEN # (27 IS THE ESCAPE KEY)
MAIN::SHOW_SCORE()
ELSIF KEY <> 0 THEN
CONSOLE::PRINT_CHAR(KEY)
END IF
END FUNC
FUNC SHOW_SCORE()
  MAIN::DIAMOND_COUNT + 1 -> MAIN::DIAMOND_COUNT

  CONSOLE::PRINT_INT(MAIN::DIAMOND_COUNT)
  CONSOLE::PRINT(" DIAMONDS!")
END FUNC
END MODULE -
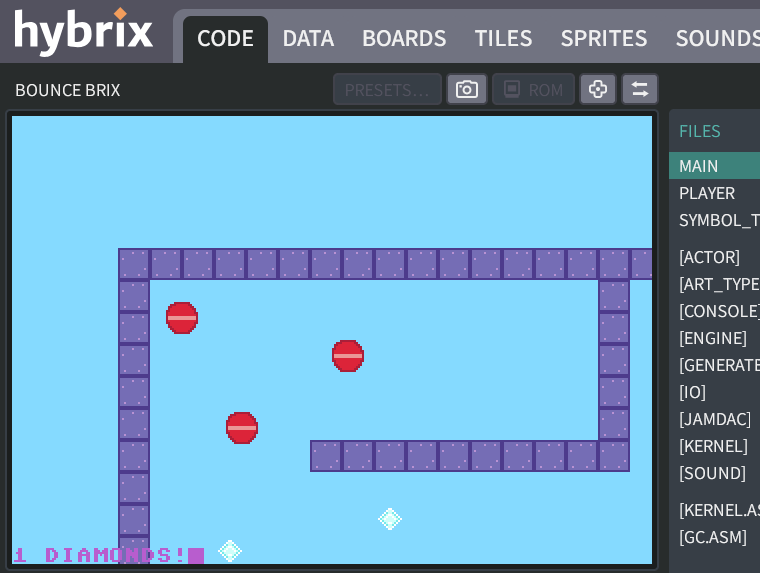
Try running the program. Then press the
ESCkey a few times. You should see an increasing number: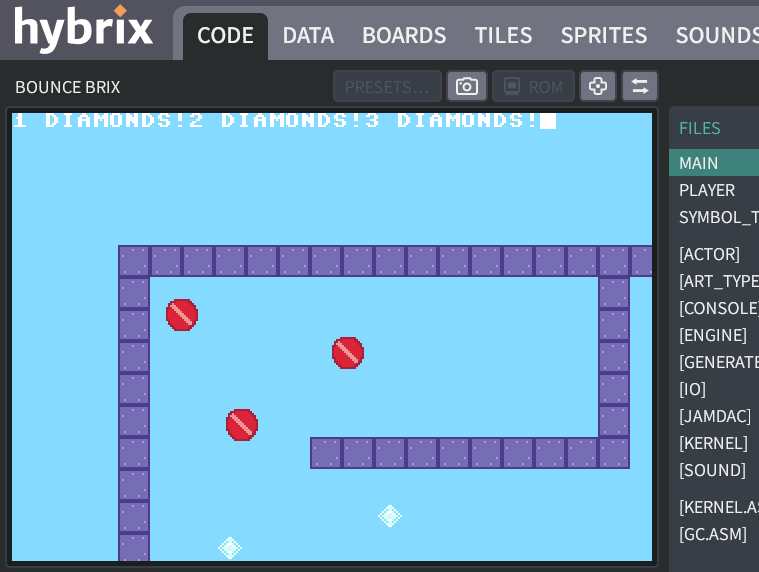
-
Can you use
{END}to move the score to the bottom of the screen? And{9}to change the color to violet? (You will need to add anotherCONSOLE::PRINTbeforeCONSOLE::PRINT_INT.)(Click to see the answer)
FUNC SHOW_SCORE()
  MAIN::DIAMOND_COUNT + 1 -> MAIN::DIAMOND_COUNT

  CONSOLE::PRINT("{END}{9}")
  CONSOLE::PRINT_INT(MAIN::DIAMOND_COUNT)
  CONSOLE::PRINT(" DIAMONDS!")
END FUNC
When you run your program, now the counter should appear like this:
-
Here's a trick: if you add
{MAT}after{9}, you can add a "matte" color backdrop to make your text more readable. The clear pixels will be replaced by whatever color number you store inIO::MATTE_COLOR. 7 will produce a white backdrop.(Click to see the answer)
FUNC SHOW_SCORE()
  MAIN::DIAMOND_COUNT + 1 -> MAIN::DIAMOND_COUNT

  7 -> IO::MATTE_COLOR
  CONSOLE::PRINT("{END}{9}{MAT}")
  CONSOLE::PRINT_INT(MAIN::DIAMOND_COUNT)
  CONSOLE::PRINT(" DIAMONDS!")
END FUNC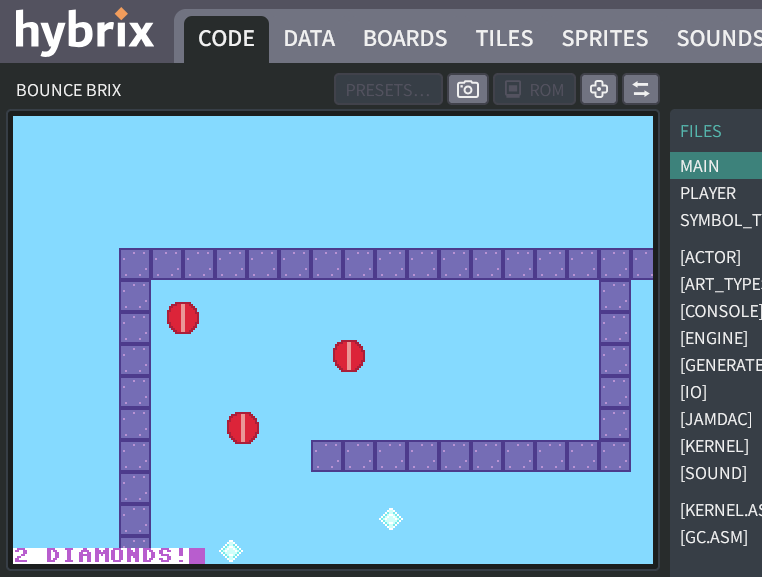
-
After
{END}, let's move the cursor one step up ({U}) and then right ({R}), to make a nice margin around our score box.(Click to see the answer)
FUNC SHOW_SCORE()
  MAIN::DIAMOND_COUNT + 1 -> MAIN::DIAMOND_COUNT

  7 -> IO::MATTE_COLOR
  CONSOLE::PRINT("{END}{U}{R}{9}{MAT}")
  CONSOLE::PRINT_INT(MAIN::DIAMOND_COUNT)
  CONSOLE::PRINT(" DIAMONDS!")
END FUNC
-
Lastly, we can make the message more compact by using the diamond ♦ graphical glyph instead of the word
DIAMONDS!. This glyph doesn't have a friendly escape sequence, but we can make an escape sequence{$99}from its HASCII hex number. Let's also add some space characters before and after to fill out the matte color backdrop:FUNC SHOW_SCORE()
MAIN::DIAMOND_COUNT + 1 -> MAIN::DIAMOND_COUNT
7 -> IO::MATTE_COLOR
CONSOLE::PRINT("{END}{U}{R}{9}{MAT} {$99} ")
CONSOLE::PRINT_INT(MAIN::DIAMOND_COUNT)
CONSOLE::PRINT(" ")
END FUNCThis final result should look like this:

If you use your keyboard to write other text on the same line as our score, you may notice that it stays there when a new score is printed. This situation could also happen if your program shows a big score like
9876, then later resets the score to0. The leftover76"junk" characters might remain on the screen.To clear this junk, you can add the
{CLL}escape code after{U}.{CLL}erases the whole line, so we can print cleanly. (Why doesn't it work correctly if you put{CLL}after{END}, or after{R}?)
Putting it all together
-
Now that we figured out how to show a score on the screen, let's use it in our game! It's just a few final code changes:
In the "MAIN" file:
- In the main
LOOP, replace theMAIN::TYPE_ON_SCREEN()statement withMAIN::SHOW_SCORE() - We can delete the whole
FUNC TYPE_ON_SCREEN()block, since it was just for experimentation. - Remove
MAIN::DIAMOND_COUNT + 1 -> MAIN::DIAMOND_COUNTfrom theFUNC SHOW_SCORE()block
In the "PLAYER" file:
- Add
MAIN::DIAMOND_COUNT + 1 -> MAIN::DIAMOND_COUNTafter the call toSOUND::PLAY_TRACK()
(Click to see the "MAIN" file for completed Exercise 6)
The "MAIN" file:
MODULE MAIN
  VAR DIAMOND_COUNT

  FUNC START()
    ENGINE::INIT()
    SOUND::INIT()
    CONSOLE::INIT()

    IF SYMBOLS::SCENES <> NULL AND SYMBOLS::SCENES.SIZE > 0 THEN
      SYMBOLS::SCENES[0].LOAD()
    END IF

    LOOP
      ENGINE::RENDER()
      ENGINE::WAIT_FOR_PAINT()
      ENGINE::THINK()
      SOUND::THINK()
      CONSOLE::THINK()

      MAIN::SHOW_SCORE()
    END LOOP
  END FUNC

  FUNC SHOW_SCORE()
    7 -> IO::MATTE_COLOR
    CONSOLE::PRINT("{END}{U}{CLL}{R}{9}{MAT} {$99} ")
    CONSOLE::PRINT_INT(MAIN::DIAMOND_COUNT)
    CONSOLE::PRINT(" ")
  END FUNC
END MODULE
(Click to see the "PLAYER" file for completed Exercise 6)
The "PLAYER" file:
CLASS PLAYER EXTENDS ACTOR
  # REMEMBER THE BALL'S VELOCITY
  VAR DX
  VAR DY

  HOOK THINK()
    IF GAMEPAD::LEFT AND .DX >= -2 THEN
      .DX - 1 -> .DX
    END IF
    IF GAMEPAD::RIGHT AND .DX <= 2 THEN
      .DX + 1 -> .DX
    END IF
    IF GAMEPAD::UP AND .DY >= -2 THEN
      .DY - 1 -> .DY
    END IF
    IF GAMEPAD::DOWN AND .DY <= 2 THEN
      .DY + 1 -> .DY
    END IF

    # ADD THE BALL'S VELOCITY, MOVING THE BALL BY ONE STEP
    .X + .DX -> .X
    .Y + .DY -> .Y

    # MAKE THE CAMERA FOLLOW THE BALL
    ENGINE::SET_CAMERA_CX(.X)
    ENGINE::SET_CAMERA_CY(.Y)

    # READ THE TILE NUMBER AT THE BALL'S CENTER
    # (FIND THE CENTER BY ADDING 8, SINCE OUR SPRITE IS 16 X 16)
    VAR TILE
    ENGINE::TILE_LAYER_B.GET_TILE_AT_XY(.X + 8, .Y + 8) -> TILE

    IF TILE = 2 THEN # DIAMOND
      # ERASE THE DIAMOND WITH USING TILE #0
      ENGINE::TILE_LAYER_B.SET_TILE_AT_XY(.X + 8, .Y + 8, 0)
      SOUND::PLAY_TRACK(ID_SOUND::SOUND_0, 0)
      MAIN::DIAMOND_COUNT + 1 -> MAIN::DIAMOND_COUNT
    END IF

  END HOOK
END CLASS - In the main
-
In Step 10, we had used the "CONFIGURE CONTROLLERS" window to disable the virtual gamepad. Let's reenable it, so you can play your game again:
Click "DONE" to close this window.
Then click "RUN" to play your game. Use the keyboard arrow keys to move your ball around. Each time you collect a diamond, now the counter at the bottom of the screen should increase by one!
-
Don't forget to click the "SAVE" button to save your work. We'll need it for the next exercise.
Great job! That's all for Exercise 6. In the next exercise, we'll make the ball bounce off the walls, so that it stays inside the maze.