Exercise 5: A maze with diamonds
Please complete Exercise 4 first, since the steps below build upon your work from that project.
In Exercise 4, we wrote code that allows a red ball move around on the screen. Now we will make a world for it to explore!
Drawing a tile
-
Open your project called "BOUNCE BRIX" that you saved from Exercise 4.
-
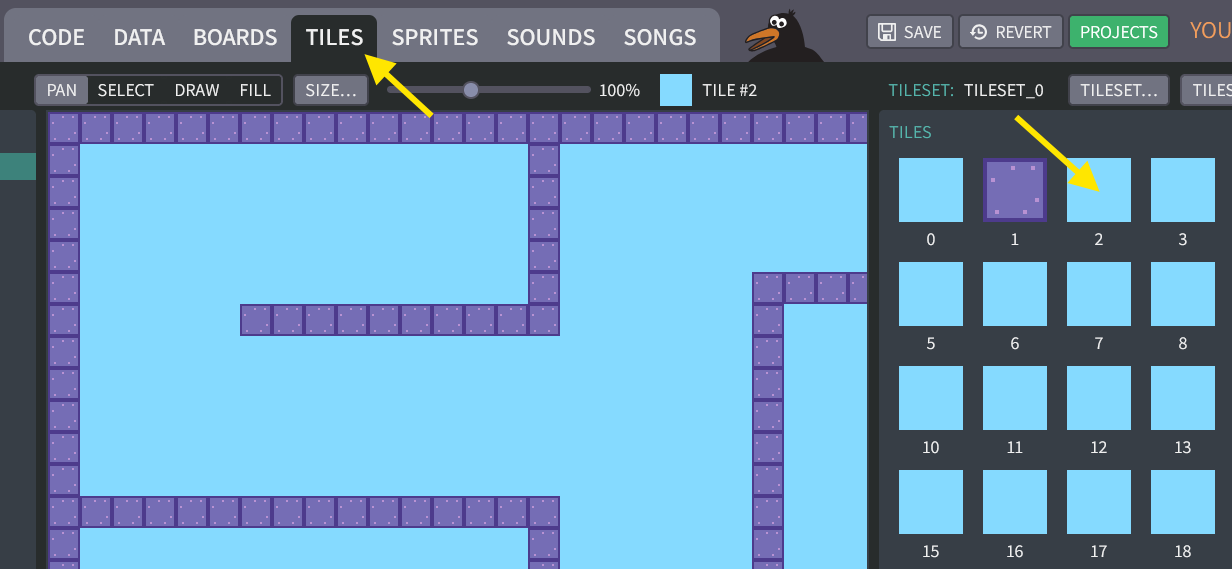
Go to the TILES screen. Click the large blue box labeled "1" on the right side of the screen:
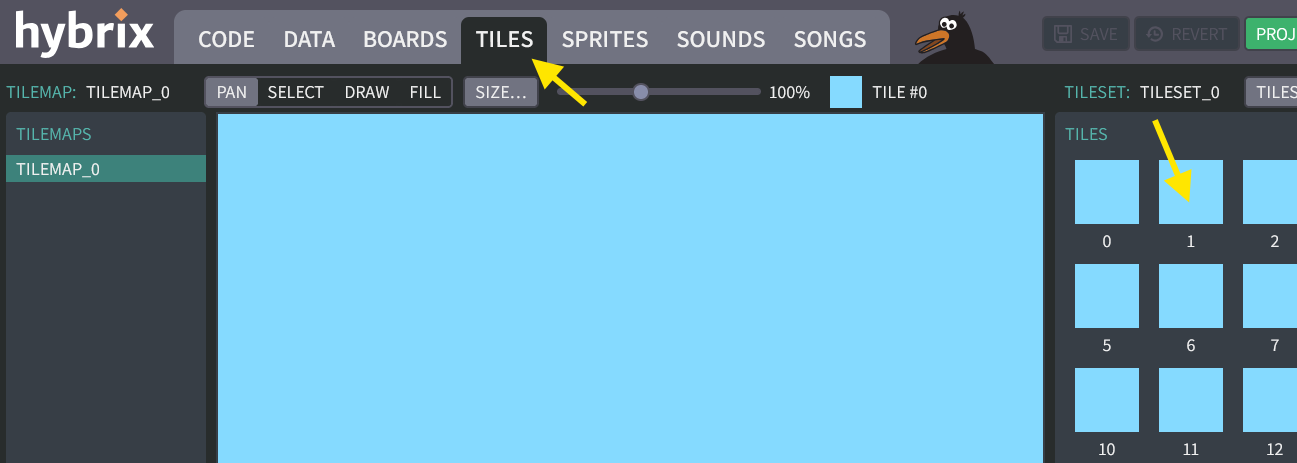
At the top center of your screen, the small blue box should change to say "TILE #1", like this:

-
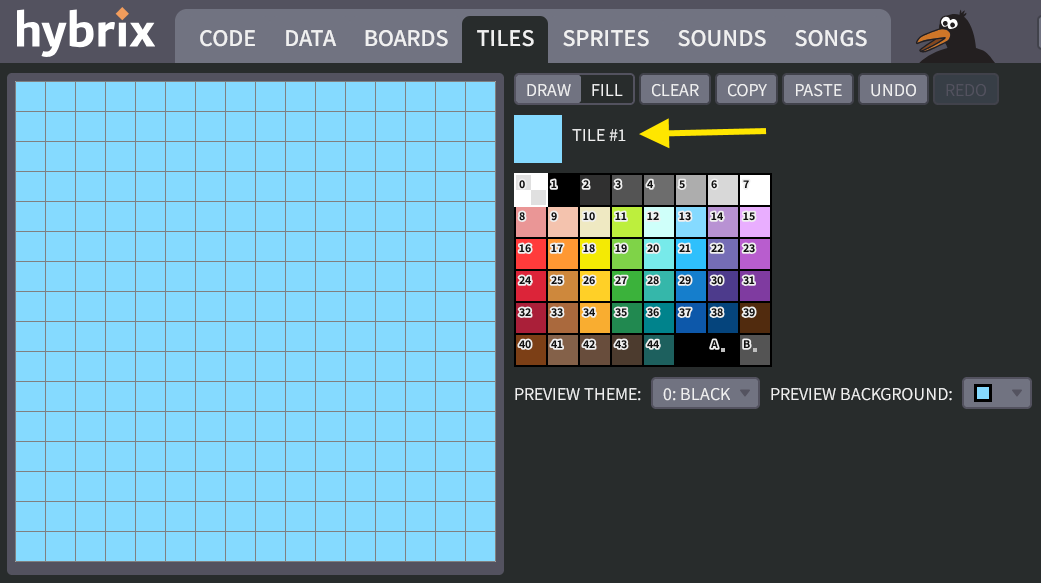
Click on the small tile. This will open the tile editor. Make sure it says "TILE #1":
-
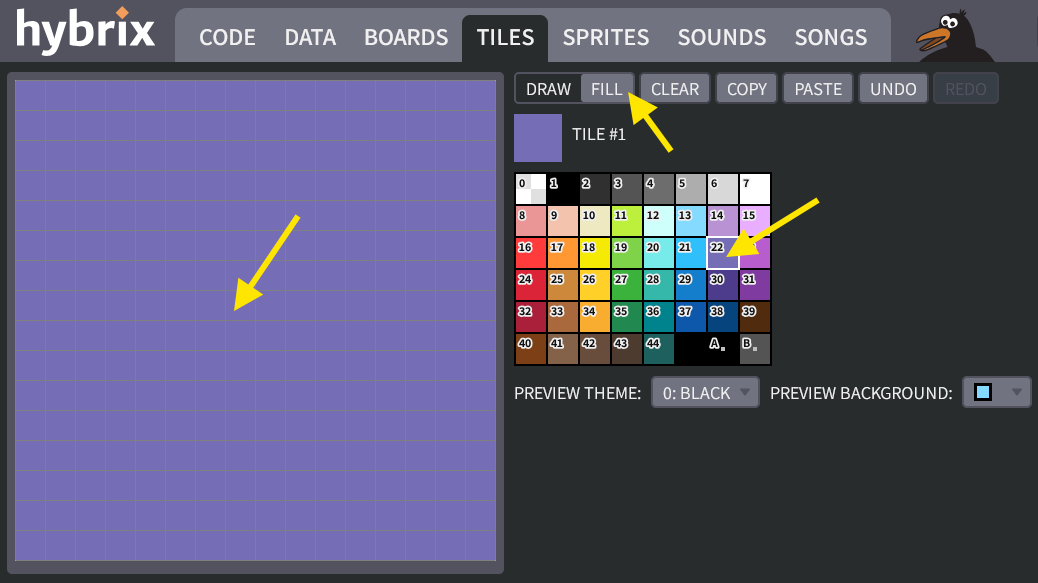
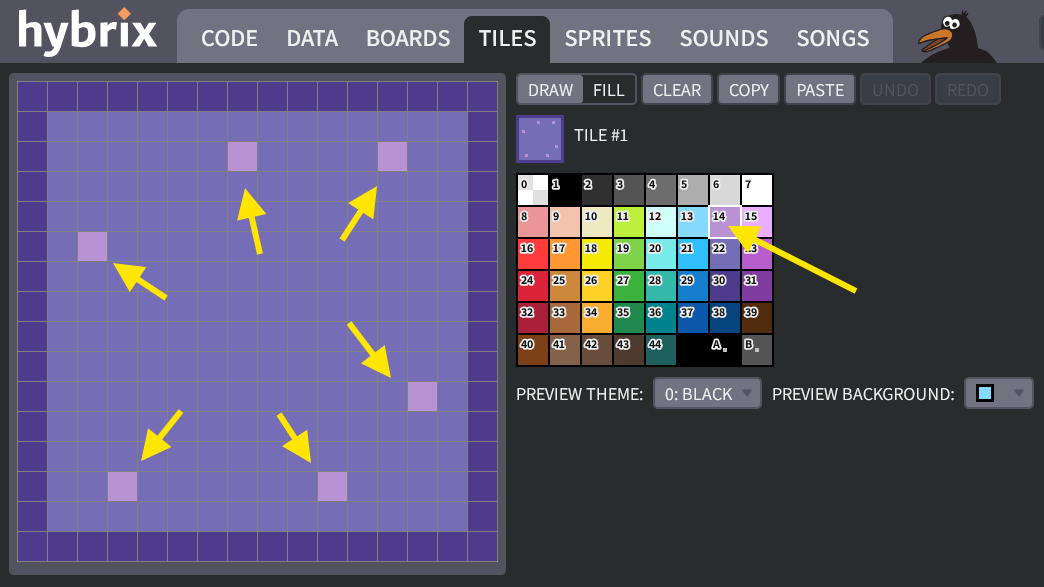
Let's use the drawing tools to make a brick. First, click color #22 (purple). Choose "FILL", and then click anywhere in the tile to fill it with purple:
-
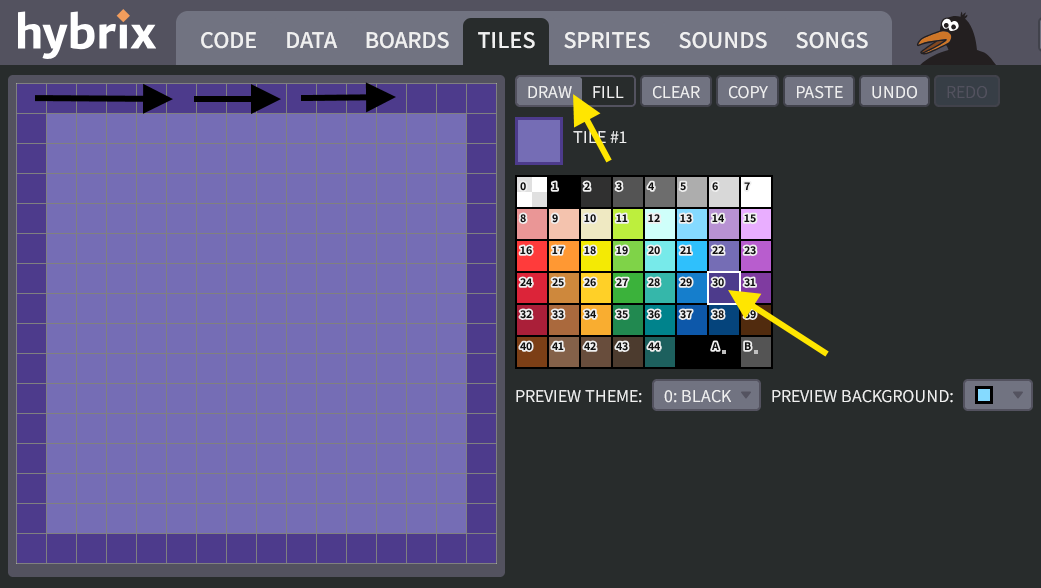
Next, click "DRAW". Choose color #30 (merlin), and draw a nice box around the border, like this:
-
Last, let's add some artistic texture. Choose color #14 (lavendare), and put a few speckles on there:
- It's okay if your tile looks somewhat different from the picture above.
- If you make a mistake in the drawing editor, click the "UNDO" button to try again.
- To undo all changes since the last time you saved, you can click "REVERT" at the top of the screen.
-
When you are finished, click the "DONE" button. Then click the "SAVE" button at the top of your screen, to save your progress so far.
Creating a tilemap
-
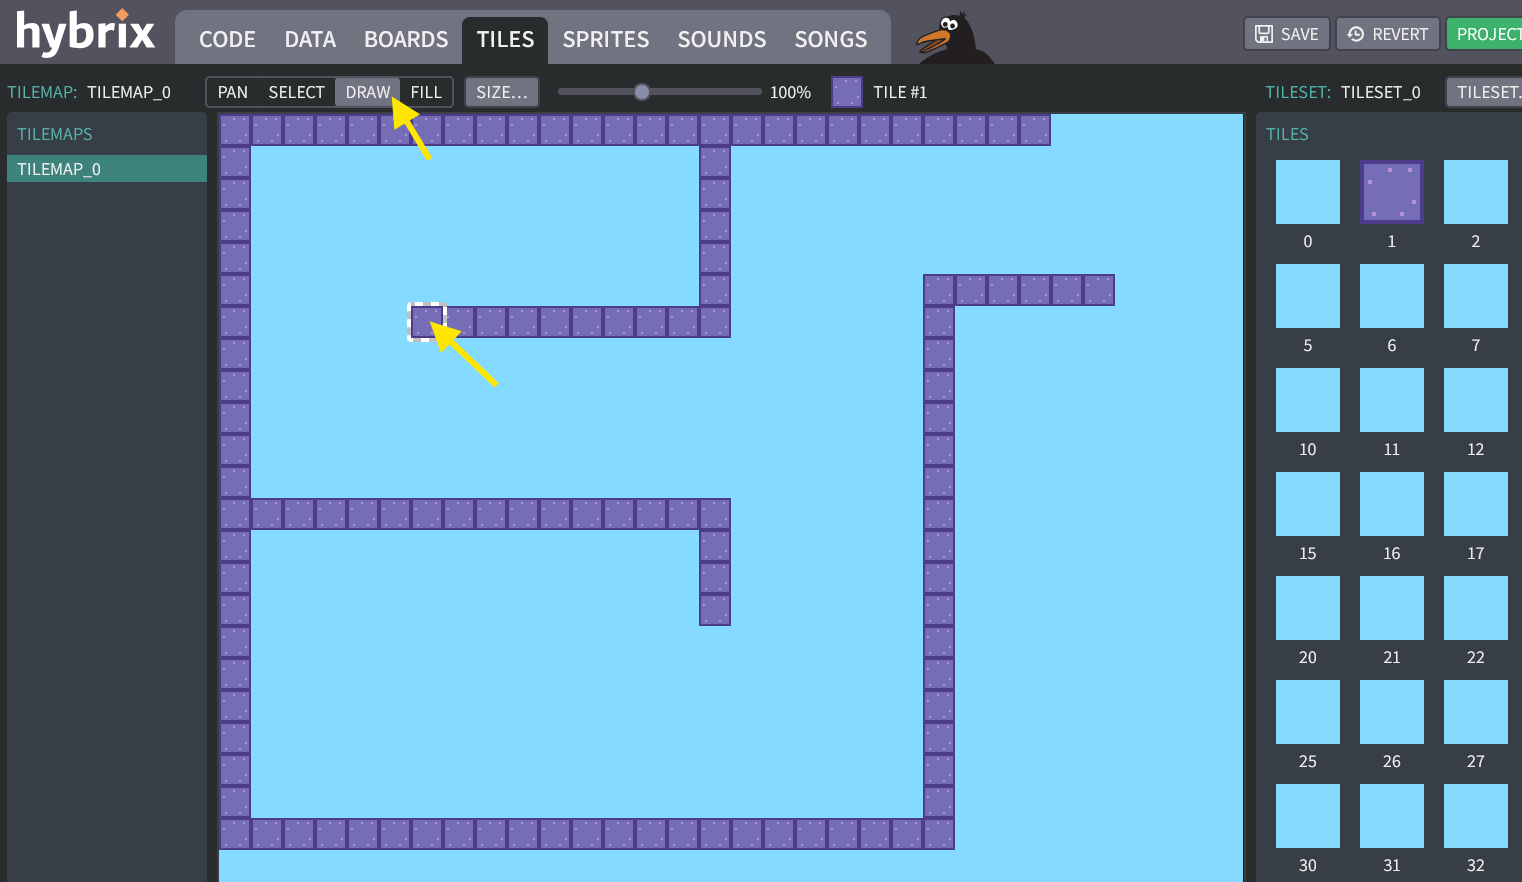
On the TILES screen, click the "DRAW" button. Make sure that "TILE #1" is still selected at the top of your screen. Then click click and drag your mouse to draw walls for a maze, like this:
- It's okay if your maze looks different from the picture above. You can always improve it later.
- If you make a mistake, click to select tile 0 (on the right side of your screen). You can "erase" by drawing using tile #0. Then select tile #1 again.
- If you want to start over, click the "REVERT" button. This will undo any changes since Step 7 above, when we clicked the "SAVE" button.
-
We can "erase" using tile #0 because that tile's pixels are all clear color, which shows the blue background. For a new project, every tile is clear, so you could also use tile #2 or #3 to erase... right now. But it will cause problems later, when we draw pictures for tiles #2 and #3.
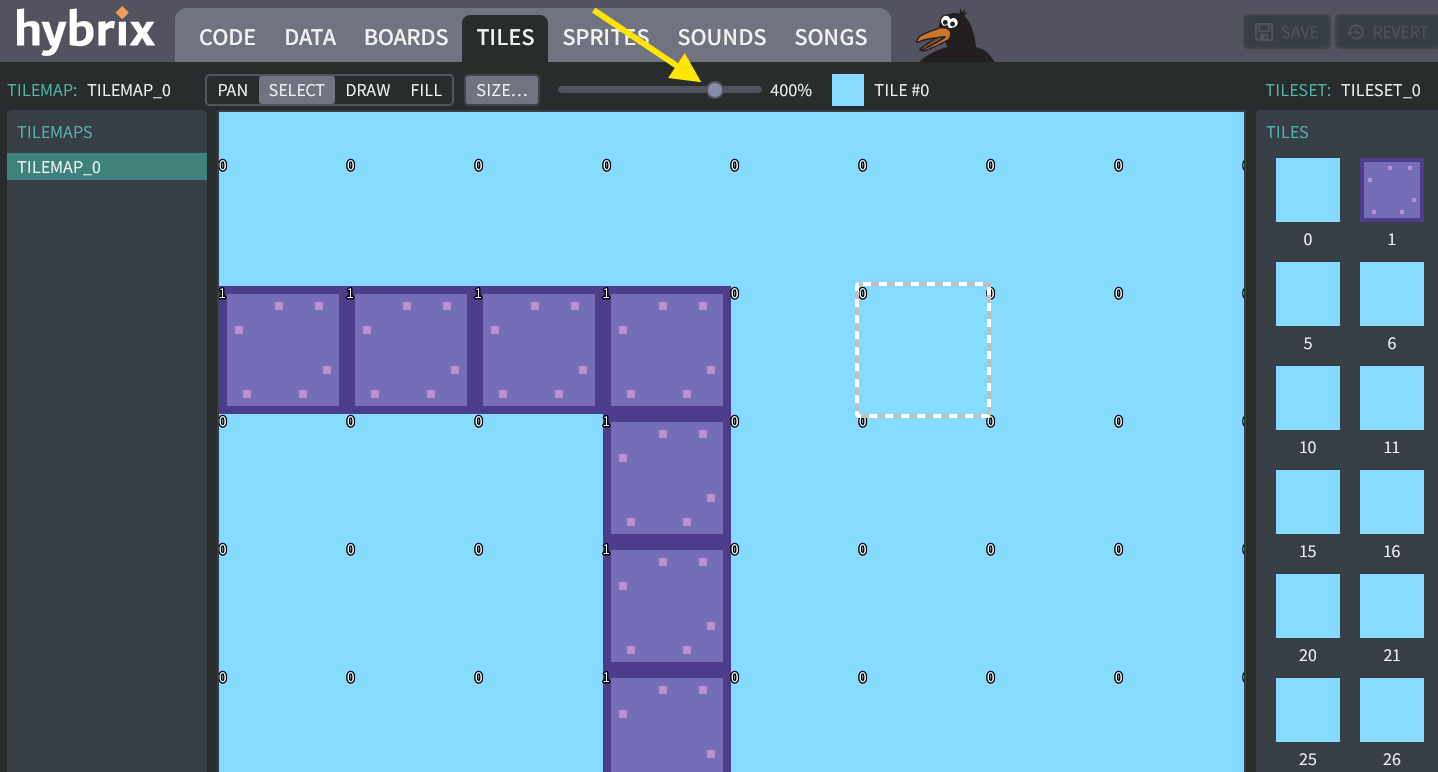
Let's make sure we're only using tiles #0 and #1 for your tilemap. Use zoom slider to zoom in. The tile numbers will appear as little white labels in the map:
If your computer's mouse has a scroll wheel, that's another way to zoom in and zoom out: On a PC, hold the
CTRLkey while moving the wheel. On a Mac, hold theALTkey while moving the wheel. -
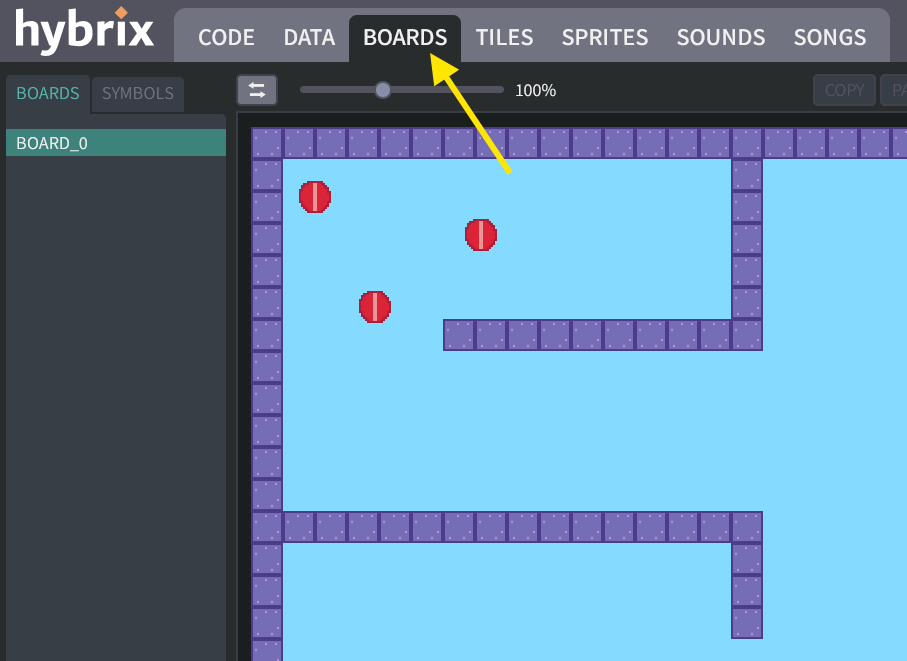
Go to the BOARDS screen. Your maze now appears behind the three balls from Exercise 4:
-
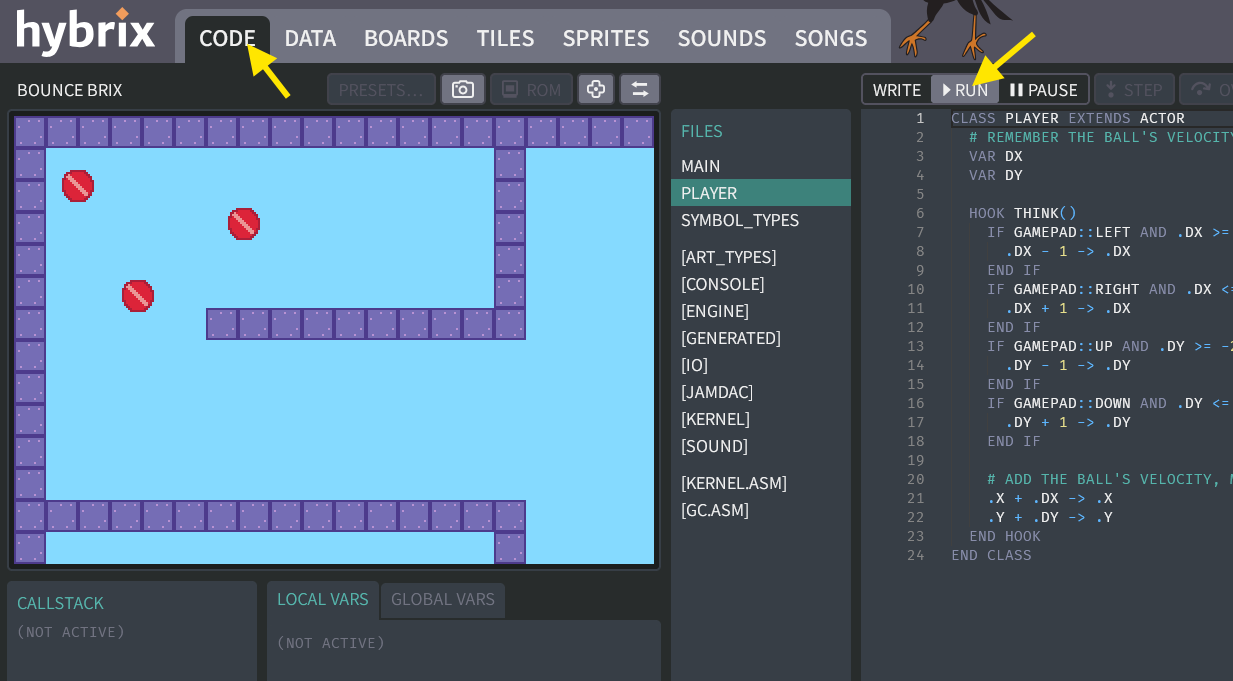
Go to the CODE screen, and click the "RUN" button. You should now be able to move your ball around on the maze:
Saving a screenshot
-
While your program is running, click the screenshot button to capture a screenshot:
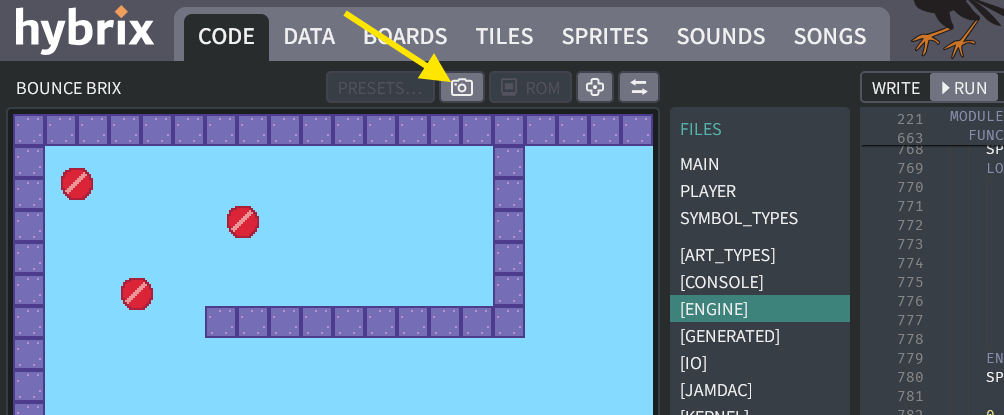
The screenshot picture isn't part of your program, but it gets saved with your project. It helps you tell your projects apart. It is shown when your program is not running.
The screenshot will also be shown in the "PROJECTS" gallery, like this:
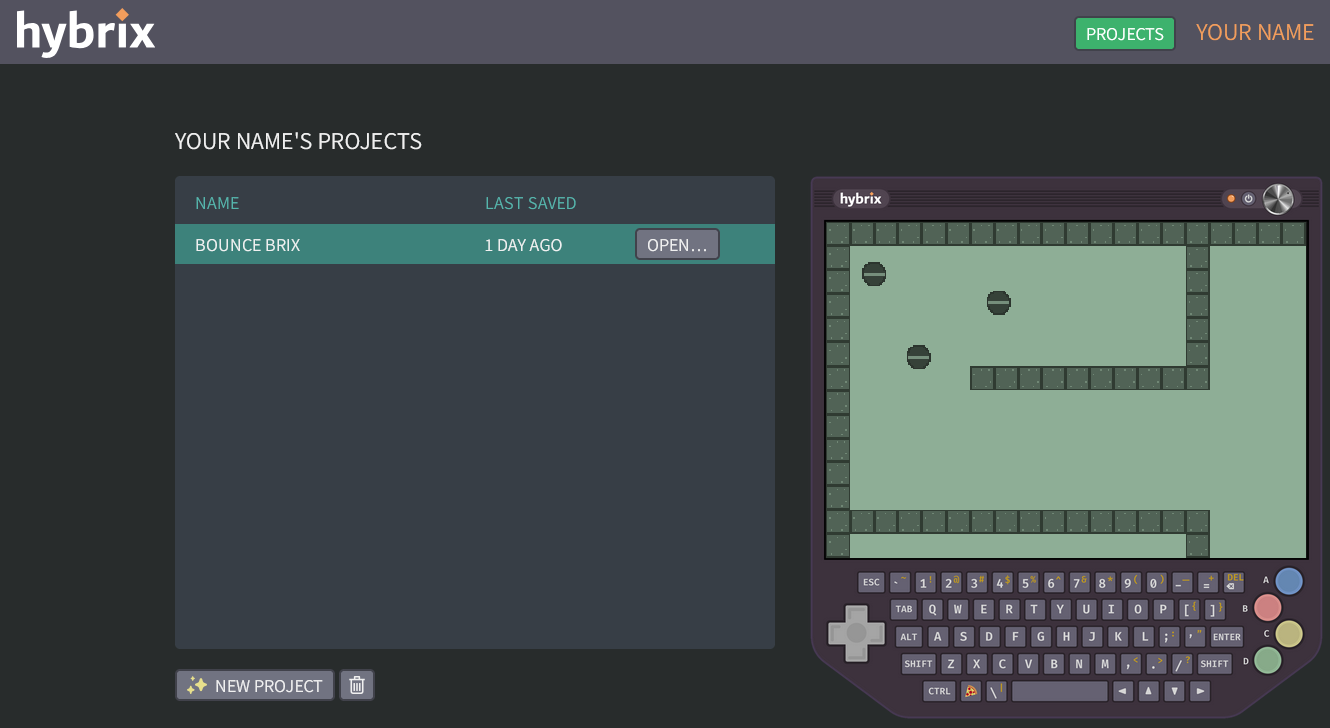
The screenshot has a green tint to remind you that it's just a picture. If you update your program but don't click the screenshot button again, then the screenshot might not be up to date. It might look different from your running program.
Moving the engine's camera
-
Running your program, you may notice that if you press the "RIGHT" arrow key, the ball disappears off the right side of your screen. That't not very fun!
Let's add a bit of code to make the scene follow the ball. We do this by updating the video engine's camera using
SET_CAMERA_CX()andSET_CAMERA_CY()functions. In these names, "CX" and "CY" mean "center X" and "center Y". If we set them equal to the ball'sXandY, then the camera will move to keep the ball in the center of the screen:# MAKE THE CAMERA FOLLOW THE BALL
ENGINE::SET_CAMERA_CX(.X)
ENGINE::SET_CAMERA_CY(.Y)Now you can fly around the maze!
(Click to see the complete "PLAYER" file with these changes)
The "PLAYER" file:
CLASS PLAYER EXTENDS ACTOR
# REMEMBER THE BALL'S VELOCITY
VAR DX
VAR DY
HOOK THINK()
IF GAMEPAD::LEFT AND .DX >= -2 THEN
.DX - 1 -> .DX
END IF
IF GAMEPAD::RIGHT AND .DX <= 2 THEN
.DX + 1 -> .DX
END IF
IF GAMEPAD::UP AND .DY >= -2 THEN
.DY - 1 -> .DY
END IF
IF GAMEPAD::DOWN AND .DY <= 2 THEN
.DY + 1 -> .DY
END IF
# ADD THE BALL'S VELOCITY, MOVING THE BALL BY ONE STEP
.X + .DX -> .X
.Y + .DY -> .Y
# MAKE THE CAMERA FOLLOW THE BALL
ENGINE::SET_CAMERA_CX(.X)
ENGINE::SET_CAMERA_CY(.Y)
END HOOK
END CLASS
Collecting diamonds
-
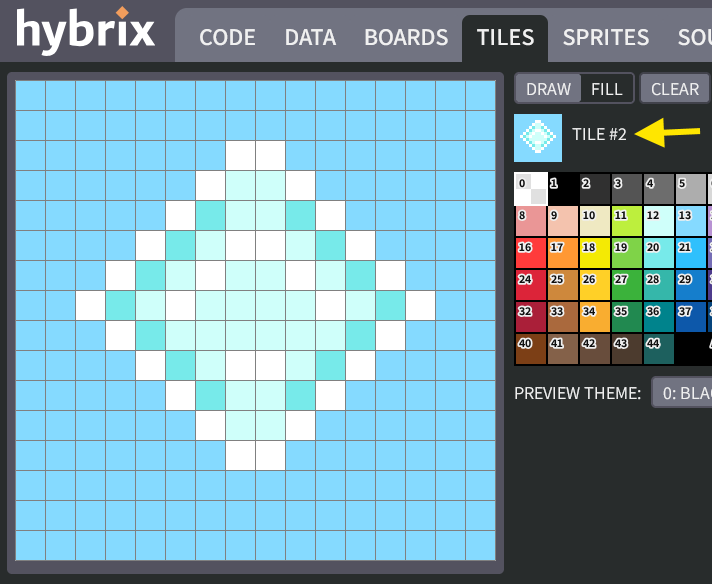
Before we finish, let's add one more fun feature to our game. Go back to the TILES screen, select TILE #2, and click to open the tile editor:
-
Draw a nice diamond gem that the player can collect. An example is shown below, but you don't need to copy it exactly. Be creative!
-
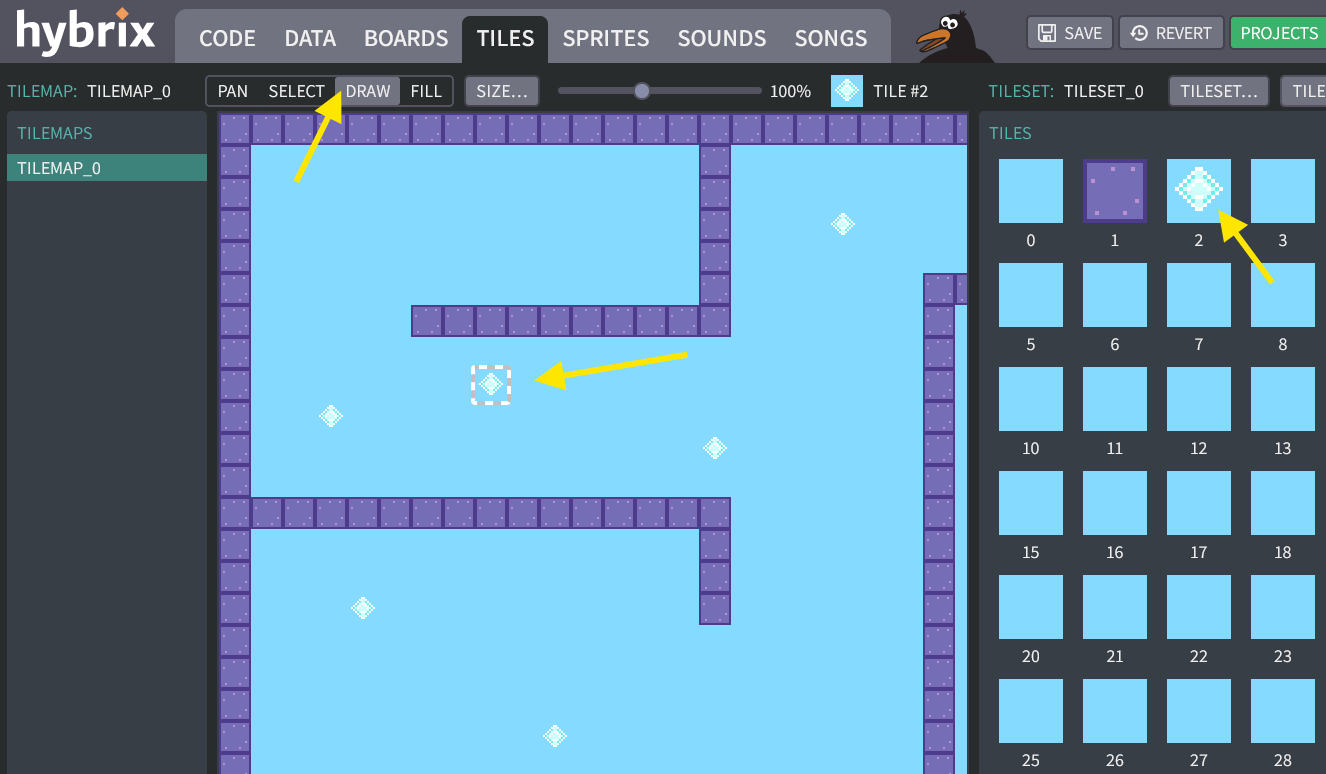
When your diamond tile is ready, click "DONE". Then click "DRAW" and fill your maze with some diamonds:
-
Lastly, we need a bit of code to erase the diamond when the ball moves over it.
# READ THE TILE NUMBER AT THE BALL'S CENTER
# (FIND THE CENTER BY ADDING 8, SINCE OUR SPRITE IS 16 X 16)
VAR TILE
ENGINE::TILE_LAYER_B.GET_TILE_AT_XY(.X + 8, .Y + 8) -> TILE

IF TILE = 2 THEN # DIAMOND
  # ERASE THE DIAMOND WITH USING TILE #0
  ENGINE::TILE_LAYER_B.SET_TILE_AT_XY(.X + 8, .Y + 8, 0)
  SOUND::PLAY_TRACK(ID_SOUND::SOUND_0, 0)
END IF
Now you can collect diamonds.
SOUND::PLAY_TRACK()plays a beep each time!For a handy summary of other functions you can use in your program, see Framework files: Function list.
(Click to see the completed Exercise 5)
The "PLAYER" file:
CLASS PLAYER EXTENDS ACTOR
  # REMEMBER THE BALL'S VELOCITY
  VAR DX
  VAR DY

  HOOK THINK()
    IF GAMEPAD::LEFT AND .DX >= -2 THEN
      .DX - 1 -> .DX
    END IF
    IF GAMEPAD::RIGHT AND .DX <= 2 THEN
      .DX + 1 -> .DX
    END IF
    IF GAMEPAD::UP AND .DY >= -2 THEN
      .DY - 1 -> .DY
    END IF
    IF GAMEPAD::DOWN AND .DY <= 2 THEN
      .DY + 1 -> .DY
    END IF

    # ADD THE BALL'S VELOCITY, MOVING THE BALL BY ONE STEP
    .X + .DX -> .X
    .Y + .DY -> .Y

    # MAKE THE CAMERA FOLLOW THE BALL
    ENGINE::SET_CAMERA_CX(.X)
    ENGINE::SET_CAMERA_CY(.Y)

    # READ THE TILE NUMBER AT THE BALL'S CENTER
    # (FIND THE CENTER BY ADDING 8, SINCE OUR SPRITE IS 16 X 16)
    VAR TILE
    ENGINE::TILE_LAYER_B.GET_TILE_AT_XY(.X + 8, .Y + 8) -> TILE

    IF TILE = 2 THEN # DIAMOND
      # ERASE THE DIAMOND WITH USING TILE #0
      ENGINE::TILE_LAYER_B.SET_TILE_AT_XY(.X + 8, .Y + 8, 0)
      SOUND::PLAY_TRACK(ID_SOUND::SOUND_0, 0)
    END IF

  END HOOK
END CLASS -
Don't forget to click the "SAVE" button to save your work. We'll need it for the next exercise.
You probably also want to update your screenshot to show the diamonds.
Great job! That's all for Exercise 5. In the next exercise, we'll learn about fonts and strings, to display how many diamonds you collected.