Exercise 3: Writing some code
Please complete Exercise 2 first, since the steps below build upon your work from that project.
In the first two exercises, you created a sprite animation of a rolling ball. Then you used the Hybrix boards system to make a program that displays three balls when the program runs. Now we will write some code to make things move around on the screen.

What is code?
Code (also called "source code") is written using a programming language such as Python, C++, C#, or Java. Hybrix uses its own language, simply called the Hybrix language. That is what we will be studying in this course. Hybrix's language is minimalist—it is designed to be easy to understand and to learn. On the other hand, professional languages have sophisticated features that enable problems to be solved using less code. That saves time at work, but those features hide important details that you must understand to become a great engineer.
What does Hybrix code look like?
Stepping in the debugger
-
Open your project called "BOUNCE BRIX" that you saved from Exercise 2. On the CODE screen, you should see two starter files. These files give you a starting point for writing own your code:
Starter file name What it does MAIN The START()function in this file is where your program begins running. It sets up the systems and then goes into a loop for "thinking" and "rendering."SYMBOL_TYPES This file defines the S_SCENEandS_ACTOR_SPOTstructures that were introduced in the previous exercise.You will also see nine framework files, whose file names have square brackets:
[ACTOR],[ART_TYPES],[CONSOLE],[ENGINE],[GENERATED],[IO],[JAMDAC],[KERNEL], and[SOUND].Unlike the starter files, you won't be changing the framework files for now. The Hybrix framework provides standard systems for animating sprites, printing text on the screen, and playing sounds and music. Throughout this course, you will get to know the framework very well. (Later, in more advanced exercises, you can delete the framework files and replace them with your own inventions.)
(There are also two system files
[KERNEL.ASM]and[GC.ASM]that use assembly language instead of the Hybrix language. You can ignore them for now.) -
On the CODE screen, click on the
MAINfile. Then click the "OVER" button a few times: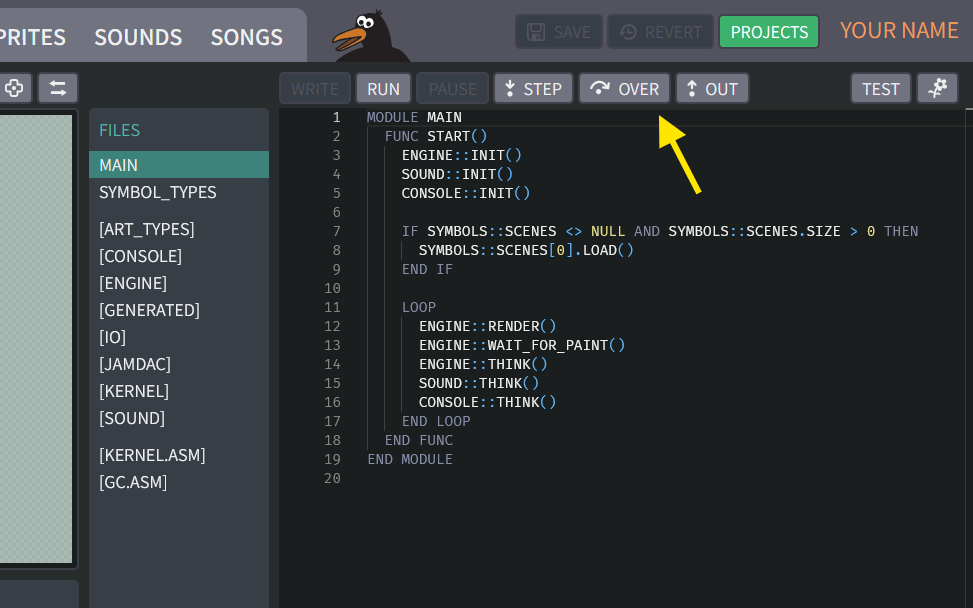
What's happening? The code contains program statements that get run in order, one by one. For example:
Code statement What it does ENGINE::INIT()Prepare the video engine that manages our sprites SOUND::INIT()Prepare the sound engine that plays sounds and songs CONSOLE::INIT()Prepare the system that can print text messages on the screen SYMBOLS::SCENES[0].LOAD()Load your scene with the 3 red balls into the computer's memory ENGINE::RENDER()When you reach this line, the 3 balls appear on the screen! 🎉
"Render" means to paint a picture on the screen. -
If you keep pressing the "OVER" button, you will notice the statements inside the
LOOPblock get run over and over again. This particular loop is an "infinite loop", which means it goes forever. Later we will see how to useDROPto exit the loop and continue with the next statement. -
A statement like
ENGINE::RENDER()is a function call statement. A function is like a little reusable recipe that we can call whenever we like.Instead of the "OVER" button (stepping over), now try clicking the "STEP" button. This will step into the function, going into the framework files, so you can see the statements inside the recipe.
-
If you keep clicking "STEP," you will go deeper and deeper into the framework files. This is because, when we are inside one function, it may contain statements that call another function. The "CALLSTACK" window shows this chain of functions:
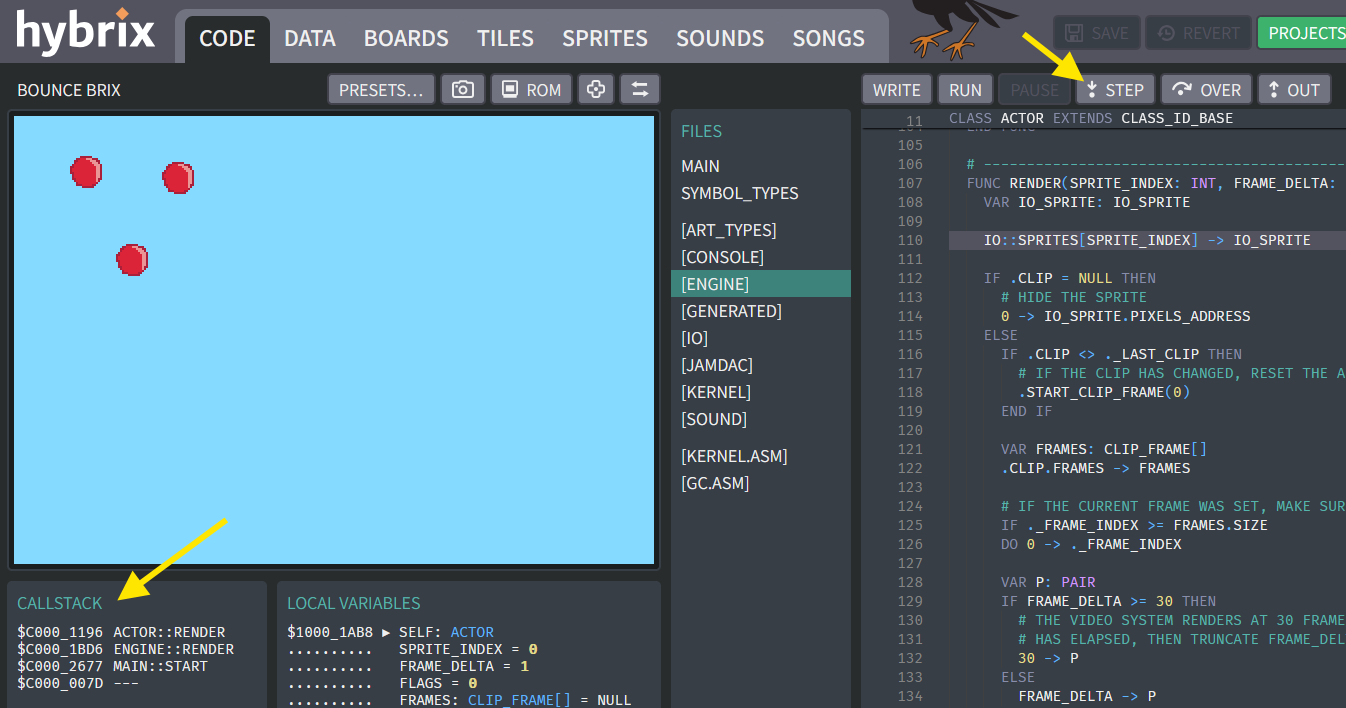
In the above picture, the
MAIN::START()function called theENGINE::RENDER()function, which then called theACTOR::RENDER()function. Each new call goes onto the top of the stack, and then they come off when the function is finished. -
To return to the top level, use the "OUT" button, which steps out of a function. For example, inside
ACTOR::RENDER(), clicking "OUT" will take us up toENGINE::RENDER(). InsideENGINE::RENDER(), we can step out again, bringing us back toMAIN::START().What happens if you click the "OUT" button inside
MAIN::START()? The program will run without stopping! That's because this function has an infinite loop -- it never returns. But you can click the "PAUSE" button, which will immediately stop at whatever statement happens to be running at the time.If this seems confusing, keep clicking the buttons ("STEP", "OVER", "OUT"), and study how it moves around. You won't break anything!
What did we learn?
- Program code is made of statements that are grouped inside functions.
- Statements get run one by one. Usually it goes from top to bottom, but sometimes we "jump around" to other places in the code.
- For example, loops jump upwards to redo something again.
- Functions allow the program to jump to a recipe of statements somewhere else. The recipe has a function name like
ENGINE::RENDER(). When that function finishes, we come back to its caller.- In the debugger, you can use the "STEP", "OVER", and "OUT" buttons to step into, step over, and step out of a function.
- The "CALLSTACK" panel shows which function you are in, as well as the chain of functions that brought you there.
Take some time to experiment some more with these buttons. Study how the program jumps around. When you feel comfortable with these ideas, proceed to step 7.
Your first code
-
Hybrix's framework manages a collection of actors such as our three red balls. Each actor has a function called
ACTOR::THINK()which contains the code that makes it do things. TheENGINE::THINK()function uses a loop to callACTOR::THINK()for each actor on the screen. But right now,ACTOR::THINK()isn't doing anything. That's why the balls just sit there.Click the "WRITE" button to stop your program if it was running. Then click the "NEW FILE" button to make a new source code file. Move your mouse over the words
FILE_0so that a pencil button appears: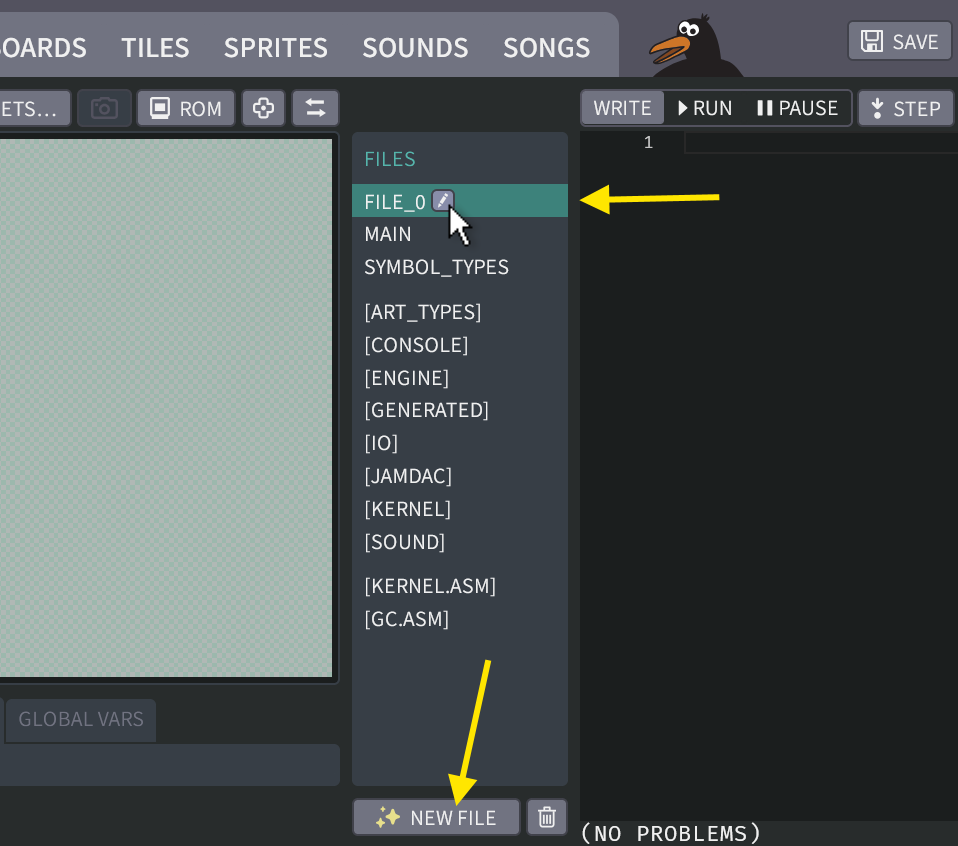
Click the pencil button, and change the file name to
PLAYER. In our video game, thePLAYERactor will be a red ball that is controlled by the player. -
Next, copy and paste this code into your
PLAYERfile:CLASS PLAYER EXTENDS ACTOR
HOOK THINK()
.X + 1 -> .X
END HOOK
END CLASSThe result should look like this, with
(NO PROBLEMS)at the bottom of the screen: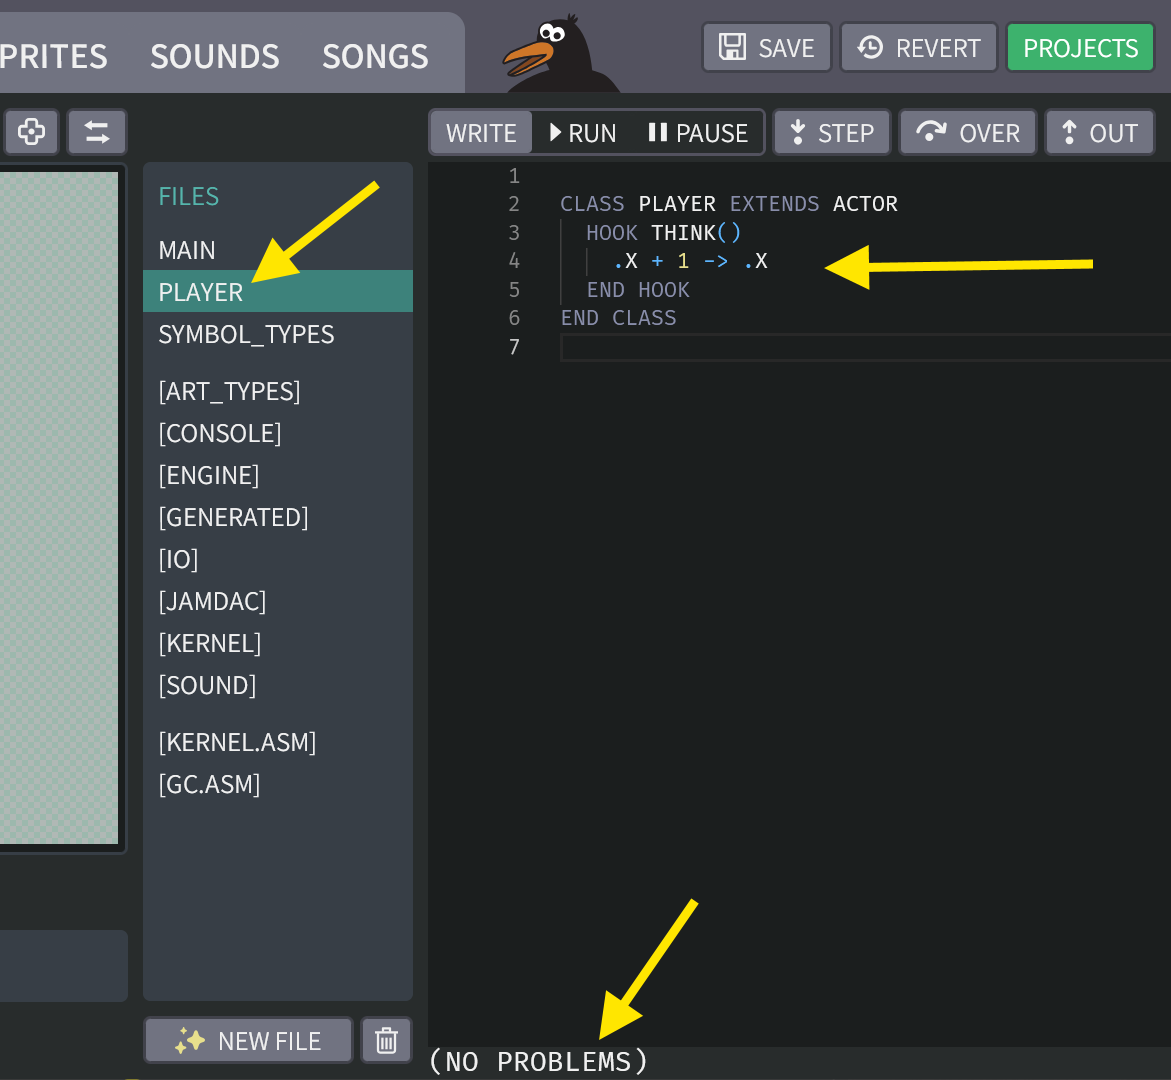
-
Click on the BOARDS tab, and then select
BALL_A(which we created in Exercise 2):
Then, in the symbol properties pane on the right, find the box labelled
ACTOR_FACTORY. Type the wordPLAYERthere, exactly as shown below: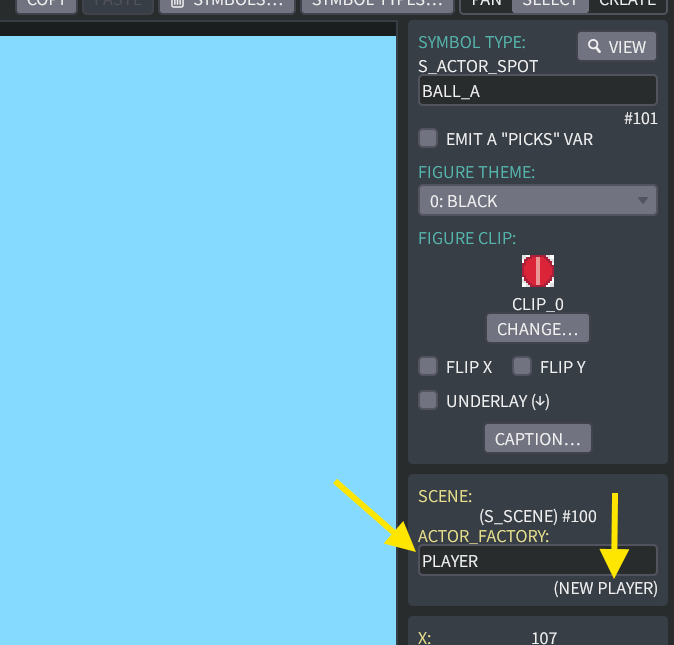
The words "(NEW PLAYER)" will appear under where you are typing.
What did we do?
In step 8, we created a code class called
PLAYER. For now, you can think of a Hybrix class as a collection of code that goes with an object, in this case the actor for our ball. Our class extends (builds upon) the framework'sACTORclass by adding a function forTHINK().(If you are curious, we used HOOK instead of the usual
FUNCbecause we are "hooking into" anotherTHINK()function that comes from theACTORclass. But that's not important right now.)In step 9, we told
BALL_Ato get its behavior from our newPLAYERclass, instead of the using the standardACTORclass. Let's see what that does! -
Click on the CODE tab, and then click the "RUN" button. You should see
BALL_Astart moving towards the right of your screen! The other two balls do not move, because we didn't change theirACTOR_FACTORY. They still useACTORwhich just sits there, animating the sprite.Why does the ball move? Every actor's position on the screen is controlled by two variables,
.Xand.Ywhich are (X, Y) geometry coordinates. The X coordinate goes horizontally from left to right. The Y coordinate goes vertically from top to bottom.Each time the screen is updated, our
THINK()hook gets called. The line.X + 1 -> .Xsays to add one to the value of.Xand then store it back into.X. For example, if X is 11, then this statement will change it to 12.
More ways to move
-
Click the "WRITE" button to stop your program. Now try changing your code to add 1 to
.Yinstead of.X. Replace the code in yourPLAYERfile with this new code:CLASS PLAYER EXTENDS ACTOR
HOOK THINK()
.Y + 1 -> .Y
END HOOK
END CLASS
When you click "RUN" now, what happens? The ball moves downwards instead of rightwards. That is because now the Y coordinate is increasing.
-
Here are some other interesting variations that you can experiment with:
CLASS PLAYER EXTENDS ACTOR
  HOOK THINK()
    .Y + 3 -> .Y
  END HOOK
END CLASS
CLASS PLAYER EXTENDS ACTOR
HOOK THINK()
.X - 1 -> .X
END HOOK
END CLASSCLASS PLAYER EXTENDS ACTOR
HOOK THINK()
.X + 5 -> .X
END HOOK
END CLASSCLASS PLAYER EXTENDS ACTOR
HOOK THINK()
.X + 1 -> .X
.Y + 1 -> .Y
END HOOK
END CLASSDon't forget to click the "SAVE" button to save your work. We'll need it for the next exercise.
Great job! That's all for Exercise 3. In the next exercise, we will learn how to make your program read from a gamepad device, so you can control the ball yourself.